|
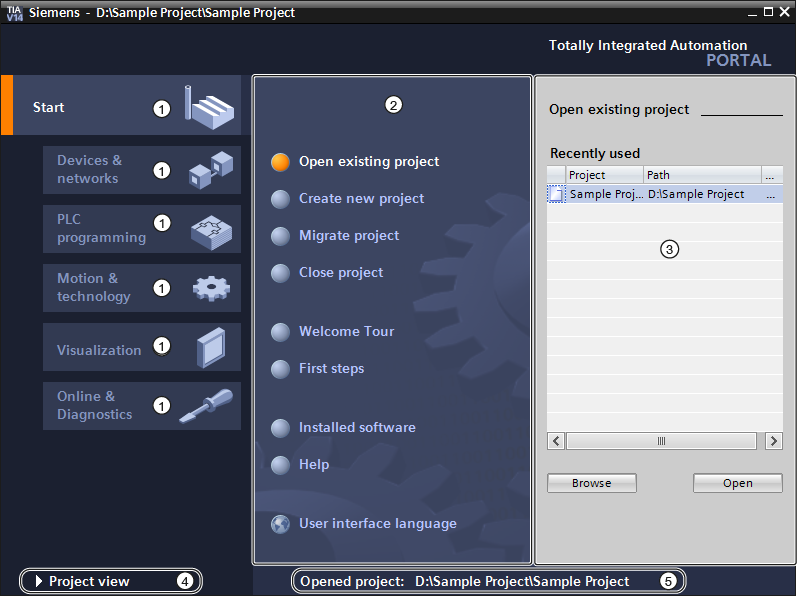
View of the portal |
Purpose of the portal view
The portal view provides a task-oriented view of the tools. Here you can quickly decide what you want to do and call up the tool for the task in question. If necessary, the view changes automatically to the project view for the selected task.
Portal view layout
The figure below shows an example of the components in the portal view:

|
① |
Portals for various tasks |
|
② |
Actions for the selected portal |
|
③ |
Selection panel for the selected action |
|
④ |
Switch to project view |
|
⑤ |
Display of the currently open project |
Portals
Portals provide basic functions for individual task areas. The portals available in the portal view depend on the products installed.
Actions for the selected portal
Here you will find the actions available to you on the selected portal. The help function can be called up in each portal depending on the context.
Selection panel for the selected action
The selection panel is available on all portals. The content of the panel will adapt to the current selection.
Switch to project view
You can use the "Project view" link to access the project view.
Display of the currently open project
Here you can find out which project is currently open.
|
View of the project |
Purpose of the project view
The project view is a structured view of all project components.
Design view layout
The figure below shows an example of the components of a project view:

|
① |
Title bar |
|
② |
Menu bar |
|
③ |
toolbar |
|
④ |
Project tree |
|
⑤ |
Reference projects |
|
⑥ |
View of details |
|
⑦ |
Place of work |
|
⑧ |
Dividers (sparators) |
|
⑨ |
Inspector's window |
|
⑩ |
Change to portal view |
|
⑪ |
Editor's bar |
|
⑫ |
Status bar with progress indicator |
|
⑬ |
Task sheets |
Title bar
The project name is displayed in the title bar.
Menu bar
The menu bar contains all the commands needed to work.
toolbar
The toolbar contains buttons for frequently used commands. This provides faster access to these commands.
Dividers (sparators)
Partitions separate the various elements of the programme interface. Arrows on the partitions allow adjacent sections of the user interface to be displayed and hidden.
Change to portal view
You can use the "Portal view" link to access the portal view.
Editor's bar
The editor bar displays the open editors. This allows you to quickly switch between open items. If you have opened multiple editors, you can display editors of the same type as a group.
Status bar with progress indicator
In the status bar, you will find the progress of the processes that are currently running in the background. This includes the progress bar, which shows the progress graphically. Hover the mouse pointer over the progress bar to display a tooltip containing additional information about the active background process. You can cancel background processes by clicking the button next to the progress bar.
If no background processes are currently running, the status bar displays the most recently generated alarm.
|
Function and structure of the project tree |
Project tree function
Using the project tree function provides access to all project components and data. The following tasks can be carried out in the project tree:
- Add new components
- Edit existing components
- Scan and modify the properties of existing components
You can select objects from the project tree using the mouse or the keyboard by typing the first letter of the desired object. If more than one object starts with the same letter, the next lower object is selected. The project tree must be a focused user interface element so that you can select the object with its initial letter.
Project tree layout
The figure below shows an example of areas of the project tree:

|
① |
Title bar |
|
② |
toolbar |
|
③ |
Table heading |
|
④ |
Project |
|
⑤ |
Equipment |
|
⑥ |
Grouped devices |
|
⑦ |
Security settings |
|
⑧ |
Functions between devices |
|
⑨ |
Unassigned devices |
|
⑩ |
Common data |
|
⑪ |
Documentation settings |
|
⑫ |
Languages and resources |
|
⑬ |
Online access |
|
⑭ |
Card reader / USB memory stick |
Title bar
In the title bar of the project tree, there is a button for automatically and manually collapsing the project tree. When manually collapsed, the button is "Reduced" to the left margin. It changes from a left-facing arrow to a right-facing arrow and can now be used to reopen the project tree. You can use the "Collapse automatically" button to collapse the tree automatically when you do not need it.
toolbar
The following tasks can be performed on the project tree toolbar:
- Create a new user folder; for example, to group blocks in the 'Program blocks' folder or to group devices.
- Go to the source of the link and back to the link itself.
There are two link buttons in the project tree. You can use them to navigate from the link to the source and back again.
- Show an overview of the selected object in the work area.
When the overview is displayed, the lower-level objects and actions of the elements in the project tree are hidden.
Table heading
The 'Name' column is displayed by default. You can also display the "Type name" and "Version" columns. If you display additional columns, you will see the name of the relevant type, as well as the version used for type instances from the library.
Project
In the 'Project' folder, you will find all objects and actions related to the project, e.g:
- Equipment
- Languages and resources
- Online access
Device
There is a separate folder for each device in the project, which has an internal project name. The objects and activities belonging to the device are arranged in this folder.
Grouped devices
All distributed I/O devices in the project are collected together in the folder "Ungrouped devices".
Security settings
The folder "Security settings" contains an overview of all certificates used in the project. With the appropriate authorisation, you can also manage certificates for the project there.
Functions between devices
You manage the project traces and measurements in the folder "Functions between devices". The project trace configurations and measurements are displayed in the system folder "Project traces".
Unassigned devices
Distributed I/O devices that are not assigned to a distributed I/O system appear as links in the "Unassigned Devices" folder.
Common data
This folder contains data that can be used on more than one device, such as common alarm classes, logs and scripts.
Documentation settings
In this folder, you can specify the layout of the printed project documentation.
Languages and resources
In this folder, you can specify the project languages and texts.
Online access
This folder contains all programmer / PC interfaces, even if they are not used to communicate with the module.
Card reader / USB memory stick
This folder is used to manage all card readers and other USB storage media connected to the programmer/computer.
|
Showing and hiding columns |
If required, you can display additional columns in the project tree. These additional columns show the name of the type associated with the instance and its version number.
Procedure
To display or hide additional table columns for the associated type and version number, follow these steps:
The column view of the project tree is enabled and the table header is displayed.
The selected columns are displayed or hidden. |


