| Basics of the version control interface of the TIA portal |
Introduction
The TIA Portal version control interface allows an external version control programme to be connected to TIA Portal. This is an easy way to exchange project data with your preferred version control programme. To do this, define one or more directories on your computer as workspaces. Both the version control programme and TIA Portal access these workspaces. Therefore, TIA Portal does not interact directly with the version control programme.
The symbols in TIA Portal indicate whether the workspace objects are identical to the objects in TIA Portal or whether there are differences between them. If there are differences, synchronisation can be carried out between workspace and TIA Portal. Versioning of TIA Portal objects in the workspace can be carried out via the version management server.
| Note You will find details of working together on objects in the help of your version control programme. |
Working with work areas
The workspace serves as a synchronisation directory with both TIA Portal and an external version control programme. Once you have defined a new workspace and linked it in TIA Portal to a directory in the file system, you can export your objects from TIA Portal to this workspace. In an external version control program, place this directory in the file system in the version management area. The specific procedure depends on the version control programme you are using. In future, you will be able to synchronise both TIA Portal and the external version control programme with this workspace. The workspace is therefore a key element of the TIA Portal version control interface.
You can manage the following object types using an external version control programme:
- Organisational blocks (OB)
- Function blocks (FB)
- Functions (FC)
- Data Blocks (DB)
- PLC data types
- PLC tag tables
They can also be used as secure objects if you have not set a password for them or if you know the password.
However, the following objects cannot be synchronised with an external version control programme:
- Know-how security blocks
- Types of libraries
Supported objects cannot be edited using the workspace editor. They can only be edited in their respective editors, e.g. the programme editor. Changes to the above object types in the project will be automatically applied in the workspace editor. Therefore, the project area always reflects the latest version of the project.
You have the option of setting up an external comparison program. This can later be used in the workspace editor to determine the differences between an object in the project and a connected workspace file.
| Note Please note that export and synchronisation operations cannot be triggered for files or directories that have been entered into an external version control program and are therefore write-protected. Select all files and directories if you want to access them via TIA Portal. |
Connection options
When you export an object from TIA Portal to the workspace, the object is linked to the corresponding workspace file. You cannot link this workspace file to any other object on the same TIA Portal project device. However, if there are several devices in your project, you can link the workspace file to other objects on different devices. In this way, you can reuse generic objects in different places in the project.
But as with multiple uses with synchronisation, there is a risk of overwriting, you can use "Export" as the synchronisation action for only one of the uses. However, if you have set "Export" for several objects, the synchronisation will not take place and you will receive a message. This ensures that the workspace file is not changed from different objects.
Installation of the version control interface
You will receive the version control interface after installing "TIA Portal Openness". A separate installation is not required.
| Note Note the following:
|

| Overview of the workspace editor |
Workspace editor function
Using the workspace editor, you can configure local workspaces and exchange objects between TIA Portal and the local workspace. The workspace editor also displays the status of the objects, i.e. whether there are differences between the version of the object in TIA Portal and the version in the local workspace.
Structure of the workspace editor
The figure below shows the components of the workspace editor:
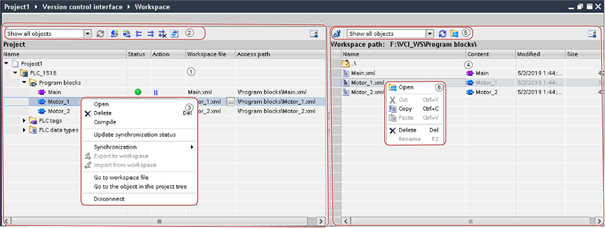
| ① |
Project area |
| ② |
Project area toolbar |
| ③ |
Project area shortcut menu |
| ④ |
Working area |
| ⑤ |
Workspace toolbar |
| ⑥ |
Workspace shortcut menu |
Project area
The project area hierarchically displays all project elements that can be versioned using an external version control program in the work area. Additional information is available for objects that you have already exported.
The table below shows the importance of the columns in the project area:
| Column |
Description |
| Name | Name of facility |
| Status | Comparison status indicating whether there are differences between the version of the object in the project and the version in the workspace. |
| Action | An action you can perform to eliminate differences between the version of an object in the project and the version in the workspace. |
| Workspace file | The name of the file under which the object is saved in the workspace. |
| Access path | Relative path of the workspace file to the workspace directory |
The comparison status is displayed automatically for all objects exported to the workspace. The comparison is based on checksums.
The following table shows the symbols for the results of comparing the objects in the project with the objects in the configured workspace:
| Symbol |
Description |
 |
The compared versions of the object in the project and workspace are identical. |
 |
The facility is only available in the project. |
 |
The compared versions of the object in the project and workspace differ. The TIA Portal object has been changed since the last synchronisation operation. |
 |
The compared versions of the object in the project and the workspace differ. The workspace file has been changed since the last synchronisation operation. |
 |
The compared versions of the object in the project and the workspace differ. Both the TIA Portal object and the workspace file have been changed since the last synchronisation operation. |
 |
The result of the comparison is not known. |
The table below shows the symbols of the comparison results for folders and other container elements:
|
Symbol |
Description |
 |
All lower-level elements are identical in the project and in the workspace. |
 |
One or more lower level elements are different. |
Project area toolbar
The following functions of the project area can be accessed via the toolbar:
-
Filter project area
Specifies which objects are to be displayed in the project area.
-
Update the project area
Updates the view of the project area.
-
Import changes from the workspace
Specifies that all modified objects are to be imported from the workspace into the TIA Portal project when the next synchronisation operation is performed.
-
Export changes to the workspace
Specifies that all modified objects are to be exported from the TIA Portal project to the workspace when the next synchronisation operation is performed.
-
Import everything
Specifies that all objects are to be imported from the workspace into the TIA Portal project when the next synchronisation operation is performed.
-
Export everything
Specifies that all objects are to be exported from the TIA Portal project to the workspace when the next synchronisation operation is performed.
-
Reject all actions
Resets the selected synchronisation actions to "No action".
-
Synchronise
Starts the synchronisation and performs the defined actions.
Project area shortcut menu
Using the shortcut menu of the project area, you can do the following:
-
open
Opens the selected object in its standard editor.
-
Delete
Deletes the selected object.
-
Compile
Compiles the selected object.
-
Compare with workspace file
Supports the comparison of objects in the project with linked workspace files. This shortcut menu entry only exists for objects that show differences to the linked workspace file. The entry contains the configured comparison programmes and a 'Configure' command with which the settings can be invoked.
-
Update synchronisation status
Updates the display in the "Status" column.
-
Synchronisation
It contains the following entries, which can be used to specify and execute various synchronisation actions:
-
Set the action for importing changes in the workspace
Specifies that all modified objects are to be imported from the workspace into the TIA Portal project when the next synchronisation operation is performed.
-
Set action for project changes to be exported
Specifies that all modified objects are to be exported from the TIA Portal project to the workspace when the next synchronisation operation is performed.
-
Set action for all changes to be imported
Specifies that all objects are to be imported from the workspace into the TIA Portal project when the next synchronisation operation is performed.
-
Set the action for all changes to be exported
Specifies that all objects are to be exported from the TIA Portal project to the workspace when the next synchronisation operation is performed.
-
Reset activities
Resets the selected synchronisation actions to "No action".
-
Perform actions
Starts the synchronisation and performs the defined actions.
-
-
Export to workspace
Exports the selected object to the workspace. If the workspace file is already linked to this object, the file is overwritten. Otherwise, a new workspace file is created.
-
Import from the workspace
Imports the workspace element into the project. If the project already contains an object that is linked to the workspace element, this object is overwritten during import. Otherwise, a new object is created.
-
Go to the workspace file
Shows the workspace file linked to the selected object in the workspace.
-
Navigate to an object in the project tree
Shows the selected object in the project tree.
-
Disconnect
Separates the connection between an object in the project and the workspace file connected to it.
Working area
The workspace area displays all files in the directory configured as a workspace. Files and folders are displayed flat, without hierarchy. You can double-click a folder to open it and display the contents. To display higher-level files and folders, double-click ".... ".
If a file in the workspace directory is incompatible with TIA Portal, it is displayed in the workspace area but cannot be imported.
The table below shows the meaning of the columns in the workspace:
|
Column |
Description |
| Name | File name |
| Content | The object contained in the file |
| Modified | Date of last amendment |
| Size | File size in bytes |
You can sort the work area by column in ascending or descending order. To do this, click on the table header of the column by which you want to sort. This will sort the column in ascending order. Click the column table header again to sort the column in descending order. A third click on the table header of the same column will cancel the sorting again.
Workspace toolbar
Use the toolbar to access the following workspace functions:
-
Configure the workspace
Opens the workspace configuration dialog.
-
Filter workspace
Specifies which objects are to be displayed in the work area.
-
Refresh the workspace
Updates the view of the work area. You can also press the key when the workspace is in focus.
-
Open Windows Explorer
Opens Windows Explorer and displays the directory that is currently active in the workspace.
Workspace shortcut menu
Using the workspace shortcut menu, you can do the following:
-
open
Opens Windows Explorer and displays the selected workspace file.
-
Cutting
Cuts the selected workspace file and saves it to the clipboard.
-
Copy
Copies the selected workspace file to the clipboard.
-
Paste
Inserts a copied or cut workspace file from the clipboard in the selected location.
-
Delete
Deletes the selected workspace file.
-
Transform
Shows the name of the selected workspace file in edit mode. In this mode, you can enter a new name.

| Change of export format |
You can change the export format of SCL blocks, data blocks and PLC data types. Note that you can also re-import only the formats you have set.
Procedure
To change the export format, follow these steps:
|
Result
The change will be applied and does not need to be saved separately. Data blocks and PLC data types are henceforth exported in the selected format. Objects that have already been exported retain their current format.

| Set up an external benchmarking programme |
You can configure up to 100 external comparison programs in TIA Portal to use them in the workspace editor to make detailed comparisons between objects in the project area and related workspace files. You can assign specific file types to the comparison program or use it for all file types. You can also upload the following parameters using the comparison program:
-
$(Project.TempExportFile.Path)
Path to a temporarily exported file based on an object in the project.
-
$(Project.TempExportFile.Name)
Name of the temporarily exported file based on the object in the project.
-
$(Project.LinkedObject.Path)
Path to the object included in the project.
-
$(Project.LinkedObject.Name)
Name of the facility included in the project.
-
$(Workspace.RootPath)
Workspace root directory
-
$(Workspace.LinkedFile.Path)
Workspace file path
-
$(Workspace.LinkedFile.Name)
Workspace file name
-
$(Workspace.LinkedFile.RelativePath)
Relative path to workspace file
These parameters are used as placeholders. When the comparison program is started, the surrogate symbol is replaced by TIA Portal with the corresponding value and sent to the comparison program. To determine the parameters supported by the comparison program, refer to the documentation of the comparison program.
Configured comparison programmes can be accessed in the workspace editor via the shortcut menu. The order of the comparison programmes displayed in the shortcut menu corresponds to the order specified in the list of comparison programmes.
You can edit or delete a configured comparator at any time. If you have configured multiple comparison programmes, you can also specify the order in the table.
In Siemens Industry Online Support at the following link you will find an application for graphically comparing blocks in LAD and FBD languages. This application can be configured as an external comparison program in the TIA Portal under Version Control Interface settings.
Setting up a new benchmarking programme
To set up an external comparison programme, follow these steps:
|
Edit configured comparison programme
To change the settings of a comparison programme that has already been configured, follow these steps:
|
Determine the order in the table.
To change the order of the comparison programmes in the list and thus also in the workspace editor in the shortcut menu "Compare with workspace file", follow these steps:
|
Remove the configured comparison program
To remove a configured comparison programme, follow these steps:
|

| Create and configure workspaces |
To synchronise objects from TIA Portal with your version control software, you need at least one local workspace through which TIA Portal can synchronise these objects. You can also create multiple workspaces; however, the name of each workspace must be unique across the processor. You can also organise workspaces into groups for a better overview.
You can disconnect the connection to the workspace at any time and then reconfigure it.
In addition to the local directory you want to use for version control, you can also configure your own workspace add-ons. This is required for add-ons that extend the workspace shortcut menu with workspace-specific shortcut menus or override specific workflows. You can remove these configured add-ons from the workspace at any time.
Requirement
The project is open.
Create a new workspace
To create a new workspace, follow these steps:
|
Workspace configuration
To set up the workspace, follow these steps:
|
Termination of the connection to the configured workspace
To terminate the connection to the configured workspace, do the following:
|
Deleting a configured add-on
To remove a configured add-on for a workspace, do the following:
|

| Exporting and importing objects |
TIA Portal objects must be exported to the workspace before they can be managed by the version control programme. Objects from TIA Portal are exported to the workspace in different formats depending on their type and programming language:
- The code blocks (OB, FB and FC) are exported as XML files in the LAD, FBD, STL and GRAPH programming languages. You can select whether the SCL code blocks are to be exported as an XML or SCL file.
- You can choose whether the data blocks are to be exported as XML or DB files.
- You can select whether the PLC data types are to be exported as XML or UDT files.
- PLC tag tables are always exported as XML files.
If required, you can import objects from the workspace back into TIA Portal.
Requirement
The workspace editor is open.
Exporting objects from TIA Portal to the workspace
To export objects from TIA Portal to the workspace, follow these steps:
|
Importing objects from the workspace into TIA Portal
To import objects from the workspace into TIA Portal, follow these steps:
|

| Comparing objects in the project with related workspace files |
The symbols in TIA Portal indicate whether the workspace objects are identical to the objects in TIA Portal or whether there are differences between them. Folders and other container elements show the status of lower-level elements.
If the objects in the project differ from the connected workspace files, you can carry out a comparison using an external comparison programme. This allows you to determine the differences. The workspace editor contains a shortcut menu item for objects that differ from each other, from which you can start the comparison. This shortcut menu item depends on the configuration of the comparison programmes. Only the comparison programs configured for a given file type are offered. If the selected file contains different file types, the comparison programmes selected in the "All files" setting are offered. The order of the comparison programmes in the shortcut menu corresponds to the order in the list of comparison programmes in the settings.
Requirement
- You have configured at least one external comparison programme for the required file extension.
- The workspace editor is open.
Procedure
To compare the objects in the project with the associated workspace files, follow these steps:
|

| Synchronising objects |
When objects are exported from TIA Portal into the workspace or imported from the workspace into TIA Portal, the comparison status of these objects indicates that they are identical. If the objects or their associated files change, the comparison result will change and the comparison symbols will show where the change has occurred. You need to run a synchronisation so that the objects and their linked files are consistent again. You have the following options for selecting the actions to be carried out:
-
Identify individual actions:
For each individual object, you can specify whether it is to be exported from TIA Portal to the workspace or imported from the workspace into TIA Portal. You can also specify that no actions are to be performed for a specific object during synchronisation.
| Note Use the "Discard all actions" button on the toolbar of the project area to set the actions for all objects to "No action" if necessary. |
-
Specify the same action for all objects:
If you want to synchronise multiple objects, you can use the toolbar to specify one action for all objects. The selected action will then be applied to all objects.
| Note Note the following:
|
Requirement
The workspace editor is open.
Procedure
To synchronise objects whose versions differ, do the following:
|
Result
In the case of objects with different versions, the selected actions will be executed and you will receive a message when they have been completed. If the synchronisation was successful, the comparison status of these objects indicates that the versions of the TIA Portal project and the workspace are identical. If the synchronisation could not be carried out, an error message will be displayed. Click the link in the message window to view the corresponding log entry.

| Editing information about an object's working area |
If the name or path of a file synchronised with TIA Portal in the workspace is changed, TIA Portal will not be able to find the file. The 'Workspace file' column in the project area displays a message regarding the object that has been associated with the modified file. You can manually change the workspace file or the path so that TIA Portal can re-synchronise the object with the workspace file.
You can also remove the connection between the TIA Portal object and the workspace file. The object is no longer synchronised with the workspace.
Requirement
The workspace editor is open.
Changing the workspace file
To change the workspace file, do the following:
|
Change the access path
To change the access path, follow these steps:
|
Deleting an object's connection to a workspace file
To remove the object's connection to the workspace file, do the following:
|

| Basics of additives in the work area |
Add-ons in TIA Portal
You can use the C# language and the TIA Portal openness API to program your own add-ons to TIA Portal to extend its functionality. In some areas of TIA Portal, you can add your functions to existing shortcut menus. To create an add-on, the following basic steps are required:
- Create an add-on using the C# language and the TIA portal openness API.
- Convert the DLL file to an add-on file using the supplied software and configuration file.
- Copy the add-on file to the TIA Portal installation directory.
- Enable the add-on on the Add-ons task tab.
Additions in the workspace editor
Add-ons can be used as follows in the workspace editor of the version control interface:
- You can add general entries to the shortcut menu in the workspace.
- You can add entries specific to the Repository add-on to the shortcut menu in the workspace.
- You can extend the drag-and-drop and workspace synchronisation workflows with additional features.
Basically, these add-ons are created in the same way as other add-ons. This means that all of the above steps must also be carried out for add-ons in the workspace editor. However, the following differences should be noted:
- Workflow add-ons and repository add-ons must also be configured for the workspace.
- Additional namespaces and the objects they contain are used in programming.