Today I will focus on discussing the TIA Portal development environment and the views available. In a nutshell, I want to outline how to navigate this environment, what goes where, so that when you are developing a project you have an orientation to the available options. Let's now move to the computer screen to look at the available views.
Portal view
Pierwszym widokiem, który widzimy, jest tzw. „Portal View”. Jest to domyślny widok, który pojawia się zaraz po uruchomieniu TIA Portal. Istnieją dwa główne widoki, ale zawsze po uruchomieniu pojawi się ten, który jest aktualnie na ekranie. Oczywiście można to zmienić. Jak widzimy, ten widok jest zadaniowy, co sprawia, że jest bardziej odpowiedni do prac diagnostycznych i utrzymania ruchu, umożliwiając łatwe przejście do konkretnych zadań.

Now let's discuss what is in the different places. In the first place, we have the one, where we choose which task we want to complete. Here we see the different tasks in a column. Once we have selected a task, we move to two, where more detailed tasks related to what we selected earlier appear. At three, further options to choose from appear.
Osobiście, nie korzystam z tego widoku i przełączam się na drugi widok, oznaczony numerem cztery. To jest zmiana między widokiem „Portal View” a „Project View”. Szybka zmiana pomiędzy widokami znajduje się na dole po lewej stronie, a każdy widok ma swój przycisk. Siemens nazywa ten drugi widok szybkim wstępem do projektu, charakteryzuje się on bardziej rozbudowanym spojrzeniem na projekt. Osobiście preferuję ten drugi widok. Teraz przełączmy się na drugi widok. Jeśli klikniemy przycisk do przenoszenia widoku, uzyskamy widok projektu.
Project view
Here we see an empty development environment, without any project or hardware.
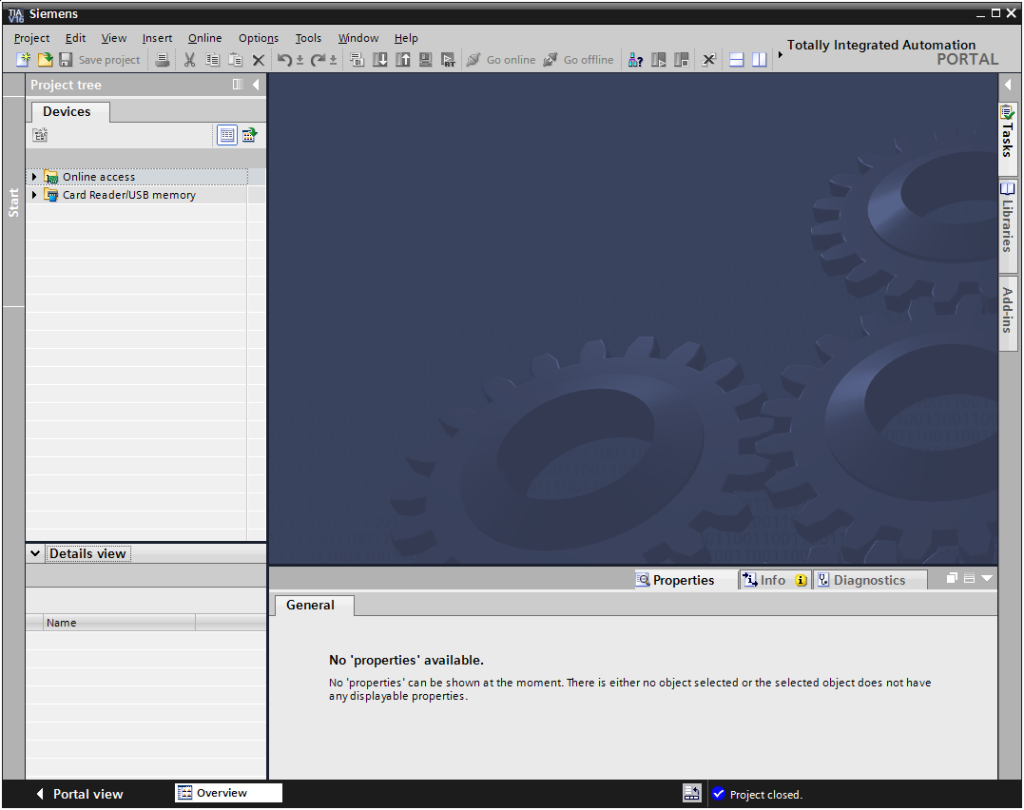
However, this view will be clearer once we have opened a project.
Now let's take a look at this open development environment.
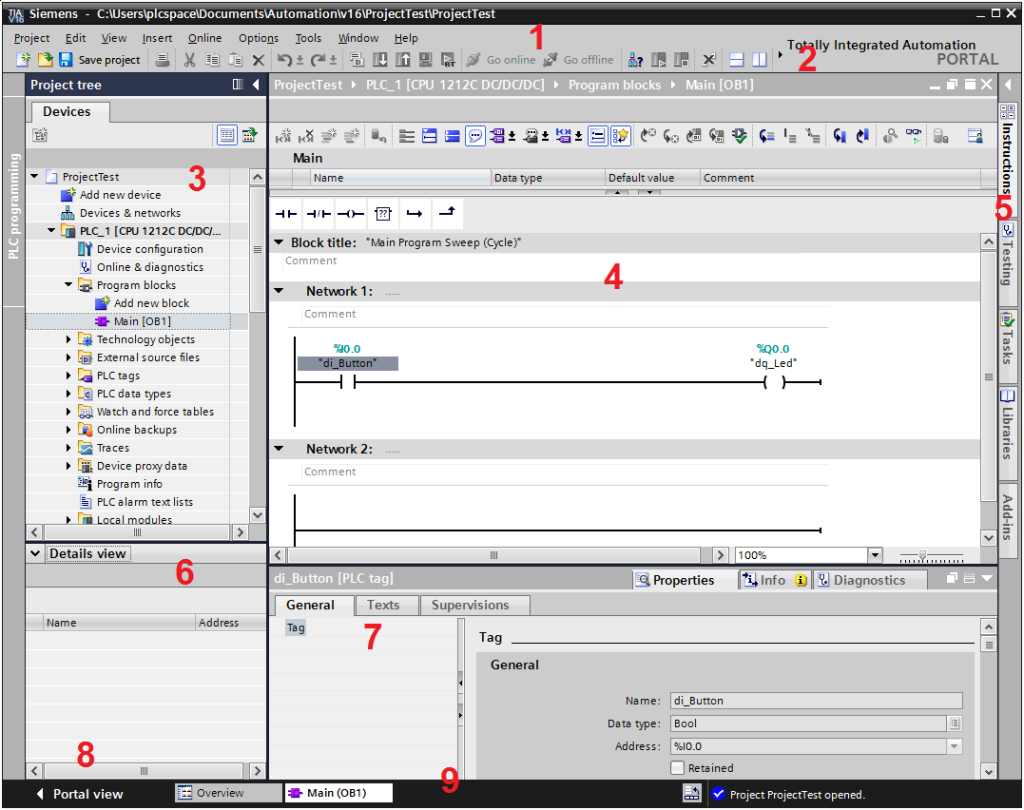
Po lewej stronie w zakładce „Device”, widzimy narzędzia przydatne do diagnostyki, zwłaszcza gdy chcemy połączyć się z rzeczywistym sterownikiem i sprawdzić błędy. Zakładka „Online Access” umożliwia połączenie się z rzeczywistym sterownikiem.
Now let's discuss the most important places in the TIA Portal development environment:
- Menu bar: This is a standard menu bar, similar to the one in any program. From this menu, it is possible to configure, set, go to various tasks and functions, such as downloading the hardware configuration from the PLC (upload).
- Design blocks: These are the blocks in which we organise our project. Each block can represent a specific part of the project, for example a PLC, HMI panels, etc.
In the following lessons, we will go through each location in detail and discuss what it is used for and what can be done there. It is worth pointing out that the TIA Portal offers a variety of functions accessible from the menu bar to facilitate the configuration, programming and diagnostics of PLCs.
If we look at the second icon, the part numbered two, we notice icons with the most commonly used tasks, such as uploading code to the driver, also known as uploading during hardware configuration. We will usually use this shortcut bar to perform these actions.
As for the third icon, the project and devices view, this is where we start all our activities. We choose whether we want to proceed to the hardware configuration, assign programme code or undertake another task. Everything is done in this project area.
The four stands for the working area, which depends on what we have selected in the project tree. Here we usually see the program code, the hardware configuration or the network view. In most cases, we will use this area as we do now, i.e. with the programme code.
Piątka reprezentuje dodatkowe karty, które zmieniają się w zależności od tego, co mamy w obszarze roboczym. Na przykład, w obszarze roboczym z kodem programu, karta 'Instruction’ zawiera instrukcje, z których możemy skorzystać podczas pisania kodu programu, takie jak instrukcje odmierzania czasu.
The sixth is the area for detailed information about what we have marked in the project tree. This space is often used to work with the so-called symbolic names that are available in the folder. This allows us to conveniently use drag-and-drop to place the relevant instructions when writing the corresponding table or parameters.
If you look at the seven, you will find the properties and the inspector window, which are most often used during the hardware configuration of the PLC. They are also used when errors occur during the compilation or uploading of program code to the controller. Here the errors will be visible. This window is used less often when entering program code, as the defaults are usually there, but sometimes some small adjustments to some blocks are needed, and this is where we can do it.
Eight is the button to change the view of the TIA Portal development environment to Portal View or back to Family, i.e. as I mentioned earlier, at the bottom left this button is always available and allows this change.
As for Nine, there is a bar similar to the one in Windows, and depending on the settings, blocks or tabs related to the driver's hardware configuration will appear at the bottom.
Summary
Overall, TIA Portal stands out because everything is concentrated in one place. All you have to do is go to the relevant tab or place where you can set up, configure the necessary parameters, and all this is done within TIA Portal. Compared to previous versions of this classic development environment, where additional windows appeared in the Windows start bar, now everything has been integrated in one place. This is, in my opinion, very useful and makes work much easier, especially with more complex configurations. Depending on the view selected, we have dedicated editors where we can adjust parameters, configure and write programme code. This is all done according to the activity currently being performed. This gives a brief overview of what TIA Portal looks like both at start-up and when opening a specific project. In the following lessons, we will focus on the individual elements of this development environment, especially when working on an open project.